
|
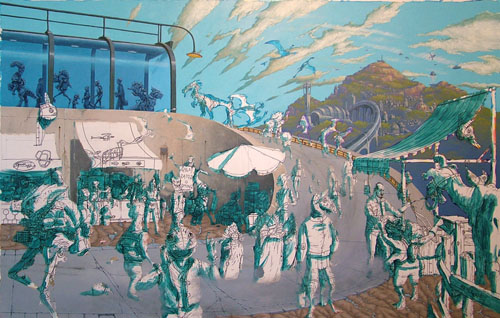
A good portion of the marketplace scene has been painted in since you saw it last. We'll get to the new version at the end of this issue. But before that:
Extreme Makeover: Marketplace Edition
|
This Extreme Makeover request comes from the daughter of one of the inhabitants of the marketplace scene. I found the daughter (Fig.1, left side) in Late Night at the Depot, where she explained to me, "My mother is the best mom in the galaxy. She works hard and is so selfless. But for the last year or two she has been... well, dull. She has been pale and colorless, lacking in definition, as if she is just a black and white representation of her normal self. Know what I mean?"
One look at the mother's picture (Fig.1, right side) and I could see what the problem was. Like the daughter explained, she was flat, boring. She lacked color and life, but it was definitely fixable. So I got the proper materials together and got to work.
|
 
Fig.1 The daughter (left), waiting on a bench for me to arrive. She wants her mother (right) to be a little more colorful, to have more depth.
|

Fig.2 The base coat applied.
|
|
|
Before any real work could be done, a basic underpainting layer had to be applied. This layer gets the overall color to about the right color and tone. Future layers will shift this color in one way or another, but it all starts here. Acrylic paint, especially the colors I used here, are transparent, not opaque. If applied directly over a white background, the strong contrast of the white would show through and make otherwise smooth transitions messy. Much like singing in a chorus, a medium value base coat helps hide the small flaws. Ironically, this layer does not have to be perfectly smooth, as you can see in Fig.2. It only has to shift the overall color to the approximate midtone of the character.
|
|
|

Fig.3 The first light coat.
|
|
Next came a ligher coat (Fig.3). This coat was less saturated and slightly lighter. The purpose of this layer is to start to define the lighter regions. Blending is difficult with acrylics, so this is the compromise. With oils you could add in light areas and blend them to create smooth transitions. This is not really an option with quick-drying acrylics, so I paint in two or three lighter layers and let the eye blend them together. You have some control over the transparency of a brush stroke (by pressure applied, how loaded the brush is, etc). By taking advantage of this, you can create a series of several steps from one layer to the next with just one color, and what looks like a full range from midtone to highlights with maybe 3 or 4 colors.
|
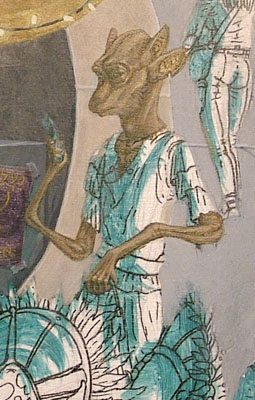
Fig.4 One step lighter.
|
|
|
The third color in this process was another lighter layer (Fig.4). I continue what was begun in the previous step by painting a lighter area within the first light area, lightening the base color a little more. Each layer helps to define the shape as I progress. Little by little the form gets built up.
|
|
|

Fig.5 The first dark coat.
|
|
It is difficult to paint the full range from midtone to light without figuring out the darks as well. Fig. 5 shows the first darker-than-midtone player, in which I start to define where the deeper shadows will be and what areas do not receive direct light.
|

Fig.6 Some details get added.
|
|
|
At this point, it seemed wise to give our Makeover recipient some individual character. Everyone has unique markings, so she deserved to have some of her own. As her daughter showed, one of the traits of this family (and perhaps species) is a spotted pattern on their coats. Following layers would darken/lighten those spots long with the rest of her.
|
|
|
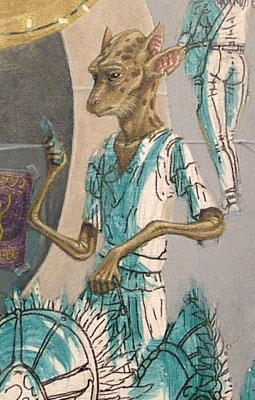
Fig.7 A series of smaller layers start to add realism.
|
|
Individual layers become more difficult to show as we get closer to the end because they are so small and quick. Fig. 7 shows several distinct layers- another application of a lighter color, a much darker dark layer to define deeper cracks and dark spots like her eyes, and an initial layer of pink around the ears and nose. This set of touches really helps to make her start to "pop", to look real. That is one point to remember when painting- it takes patience to paint the first several layers because the figure doesn't really look "there" yet. That "there-ness" often develops close to the end. Don't try to rush it.
|

Fig.8 Reflected light.
|
|
|
The difference between Fig.7 and Fig.8 is subtle, but it is an important step. If you look at the left (or shadow) side of our mother, you should notice that a lighter blue tone has been added. This is sometimes called reflected light or "bounce light"- light that bounces off of other parts of the scene and gets reflected in the dark portions of an object. Since the woman is a warm golden brown, a cool blue reflected light based on the color of the sky adds depth to her color scheme and makes her feel more dimensional and part of the picture.
|
|
Finally we gave this character a new wardrobe. The dress was painted using the same method shown above- a midtone followed by layers of light and dark that define the shape and shadows. After the initial yellow dress was finished, the color on the sleeves and the slight sparkles were added as light layers over the yellow in the same way the pink of the ears and the spots were added earlier. With a new belt, purse and grocery list, she was done.
|
BEFORE:
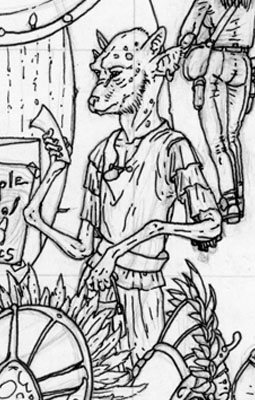
Fig.9 A year ago...
|
|
AFTER

Fig.10 ... and today.
|
The daughter was brought back to see her mom after the makeover. "EEEEEEEEK!!!!" The daughter shrieked with delight over the results. "She looks so alive again! Oh, wow, she's so much better now! Thank you so much!!!"
The number of exclamation marks she used testifies to how pleased she was. However, I noticed that the mother's earrings, which she wore as a drawing, are now gone. I'll have to replace those next time I get behind the brushes.
I want to close on another Before/After- that of the piece as a whole. Click on the "After" picture to see a larger version. Links to a set of detail pics follow. Thank you, and join us next time for Survivor: Betelgeuse*.
*Okay, not really...
BEFORE:
AFTER

Detail 1
Detail 2
Detail 3
|
|


